-
Magento
- WooCommerce
- Bigcommerce
- Shopify
-
Helix
Recommended Solutions
The following payment solutions provide an easy way for merchants who are just starting out to accept online payments. As your business grows, you can combine these with additional PayPal payment solutions.
Use PayPal Express Checkout as a standalone option, or combine it with another PayPal payment solution.
Braintree allows you to accept credit/debit cards and PayPal without any setup or monthly fees. Your customers never leave your store to complete the purchase. Check out the guide.Email templates define the layout, content, and formatting of automated messages sent from your store. They are called transactional emails because each one is associated with a specific type of transaction, or event.
Magento includes a set of responsive email templates that are triggered by a variety of events that take place during the operation of your store. Each template is optimized for any screen size, and can be viewed from the desktop, as well as on tablets and mobile devices. You will find a variety of prepared email templates related to customer activities, sales, product alerts, admin actions, and system messages that you can customize to reflect your brand.
Basic Shipping Methods
Magento Open Source supports a wide range of shipping methods and carriers. In this section you will learn how to set up that shipping methods that do not require an account with a third-party provider.
Tax Rules
Tax rules incorporate a combination of product class, customer class and tax rate. Each customer is assigned to a customer class, and each product is assigned a product class. Magento analyzes the shopping cart of each customer and calculates the appropriate tax according to the customer and product classes, and the region (based on the customer’s shipping address, billing address or shipping origin).
- Homepage (header logo, main banner)
- About us
- Contact us
- Footer (changing links in the footer, copyright)
- Category page (changing category description and banner)
Logo: Content -> Design -> Configuration -> Choose theme for your store (Edit) -> Header -> Logo -> Upload
Main Banners:
If you want add new banners:
Content -> Manage Banners -> Add New Banner -> Edit required fields and choose ‘Slider’ : ‘Home page slider’
If you want remove banners:
Content -> Manage Sliders -> Home Page Slider -> Banner of slider -> Check necessary banners
Footer:
Links: Content -> Blocks -> Footer Links Block -> Edit
Copyright: Content -> Design -> Configuration -> Choose theme for your store (Edit) -> Footer -> Copyright
About Us: Content -> Pages -> About Us
Contact us: Content -> Blocks -> Contact Map
Category page: Products -> Categories -> Choose necessary category -> Content

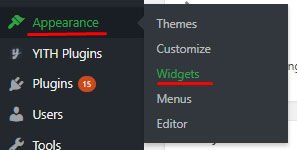
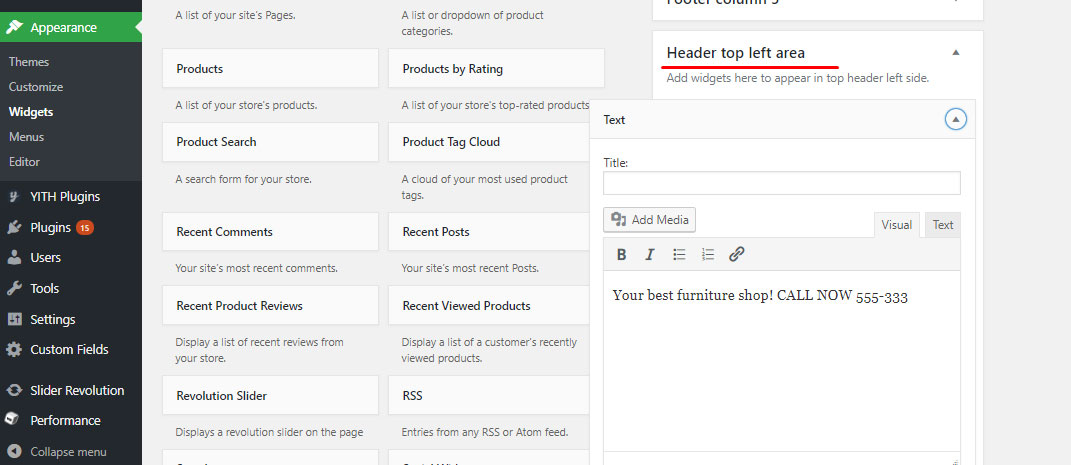
In the dashboard go to Appearance->Widgets then open box “Header top left area”, open widget “Text” and you can change message there. Save the changes once you’re done.
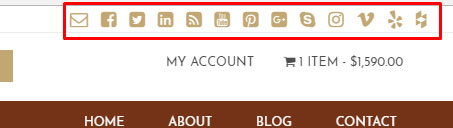
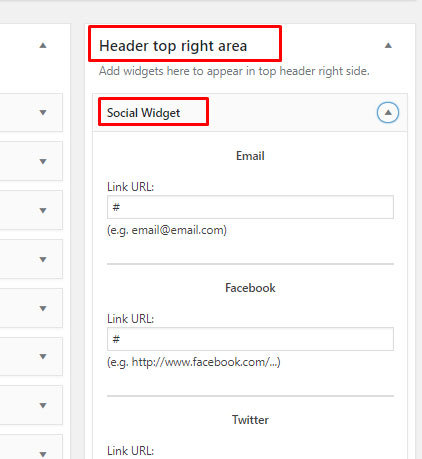
In the Dashboard go to Appearance->Widgets then open "Header top right area" box, open widget "Social Widget" and you can set proper URLs. If you leave the field empty that icon will not be visible on the front end.

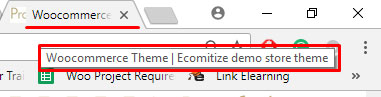
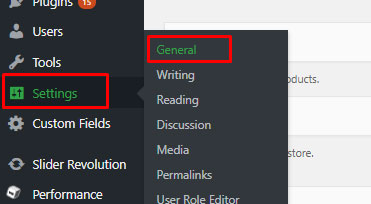
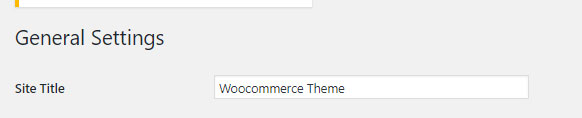
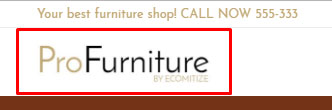
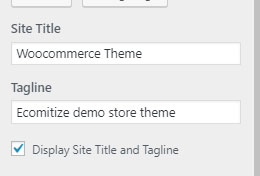
In the Dashboard go to Settings -> General and you will see there field "Site title" and “Tagline” - then insert the name and tagline you want. Then need to click on “Save Changes” at the bottom of the page.
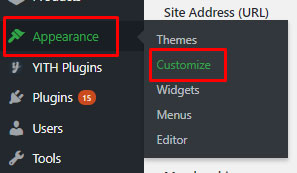
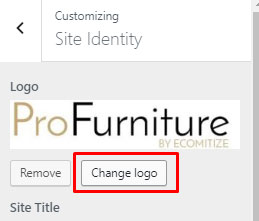
In the Dashboard go to Appearance->Customize, then click on "Site Identity" on the left side menu. Then click on the "Change logo" button. After you select new logo click on the top "Save & Publish" button.
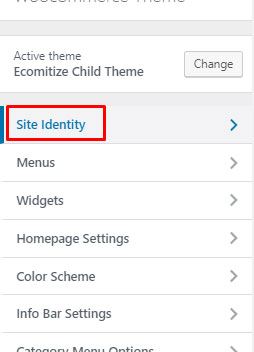
On admin side go to Appearance->Customize, then click on "Site Identity" in left side menu. You will see fields "Site Title" and "Tagline". After you change them click on a top "Save & Publish" button.

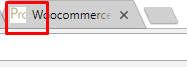
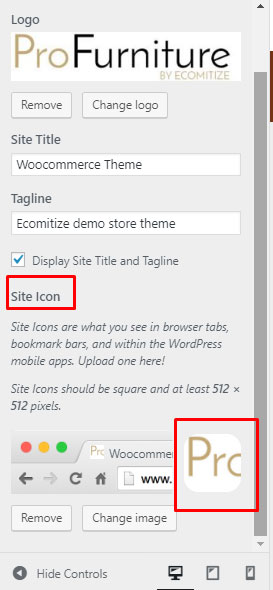
In the Dashboard go to Appearance-> Customize, then click on "Site Identity" on the left side menu. You will see the section "Site Icon", then click on the "Change Image" button. After you select the new site icon click on the top "Save & Publish" button.
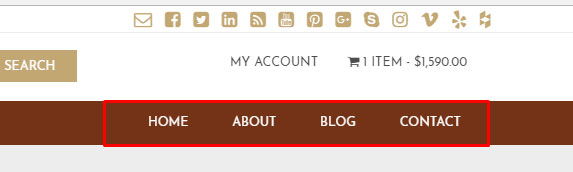
In the Dashboard go to Appearance-> Menus, then at “Select a menu to edit” option click on the menu you want to edits and click on the "Select" button. That will load the selected menu and you will be able to change it.
More details on how to work with default WordPress menus you can find in section “Set Up Menus and Navigation”. https://docs.woocommerce.com/document/docs-menus/ Please note, the left-hand main navigation menu is always connected to Counterpoint. DO NOT do any changes to the left-hand main menu in Woocommerce. Changes to these category menus have to be done in Counterpoint.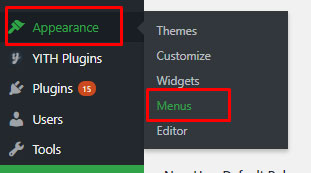
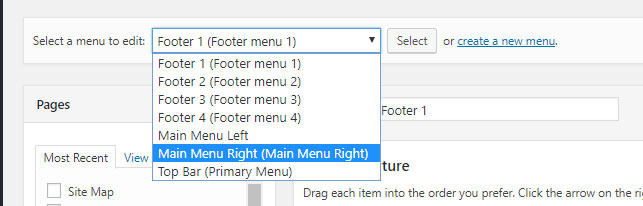
Footer "Main Menu" In the Dashboard go to Appearance->Menus, then select "Footer 1" option and click on "Select" button. That will load Footer "Main Menu" and you will be able to change it. Footer "Personal" Menu In the Dashboard go to Appearance->Menus, then select "Footer 2" option and click on "Select" button. That will load Footer "Personal" menu and you will be able to change it. Footer "Shopping" Menu In the Dashboard go to Appearance->Menus, then select "Footer 3" option and click on "Select" button. That will load Footer "Shopping" menu and you will be able to change it. Footer "Information" Menu In the Dashboard go to Appearance->Menus, then select "Footer 4" option and click on "Select" button. That will load Footer "Information" menu and you will be able to change it.

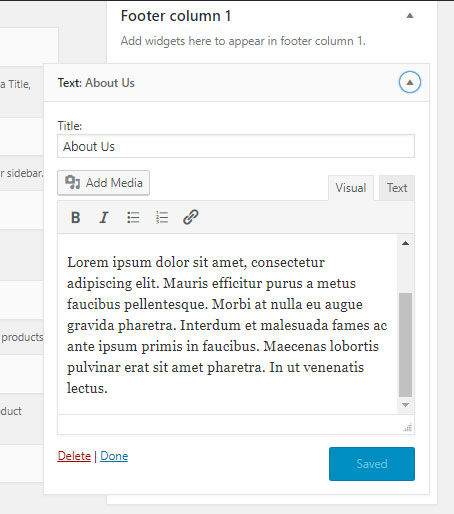
In the Dashboard go to Appearance-> Widgets then open box "Footer column 1", open the "Text: About Us" widget and you can change the content.

In the Dashboard go to "Slider Revolution", click on the front page slider and you will have the option to change slides. Detailed instructions on how to work with this plugin can be found here:
To change this section go to Pages, then select homepage and change the content then select “Update”.
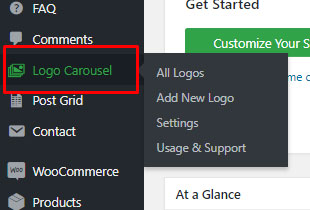
In the Dashboard go to Logo Carousel and place the logos there. To ensure that the logos appear nicely try adding same size logos, 500*250 px or 250*100 px size logos work best.
In the Dashboard go to Posts → Add New
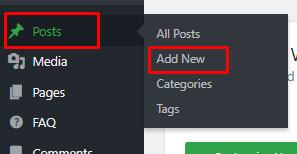
On this page, you will see the WordPress posts editor. The most important parts of this page are:
Post Title - enter the title of your post in this field. On your theme, it will be shown above your content.
Post Content - you can use the WordPress WYSIWYG editor to add the actual content of your post. Note that it has two tabs - Visual (use the editor to format your text) and Text (add your HTML code directly).

Setting up Shipping Methods:
- Flat Rate Shipping methods: https://docs.woocommerce.com/document/flat-rate-shipping/
- Free Shipping: https://docs.woocommerce.com/document/free-shipping/
- Local Pick-up: https://docs.woocommerce.com/document/local-pickup/
- Shipping insurance: https://docs.woocommerce.com/document/offer-shipping-insurance/
- Legacy Shipping options: https://docs.woocommerce.com/document/legacy-shipping-options/
- Product Shipping Classes: https://docs.woocommerce.com/document/product-shipping-classes/
- Setting up Shipping zones: https://docs.woocommerce.com/document/setting-up-shipping-zones/
Setting up Payment Methods:
- Authorize.net: https://www.xadapter.com/setting-authorize-net-payment-gateway-woocommerce/
- Paypal standard: https://docs.woocommerce.com/document/paypal-standard/
- Check payments: https://docs.woocommerce.com/document/cheque/
- BACS (Bank Transfer): https://docs.woocommerce.com/document/bacs/
- Cash on Delivery: https://docs.woocommerce.com/document/cash-on-delivery/
- Stripe: https://docs.woocommerce.com/document/stripe/
Woocommerce 3 template:
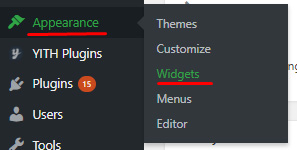
In the Dashboard go to Appearance and select Widgets.
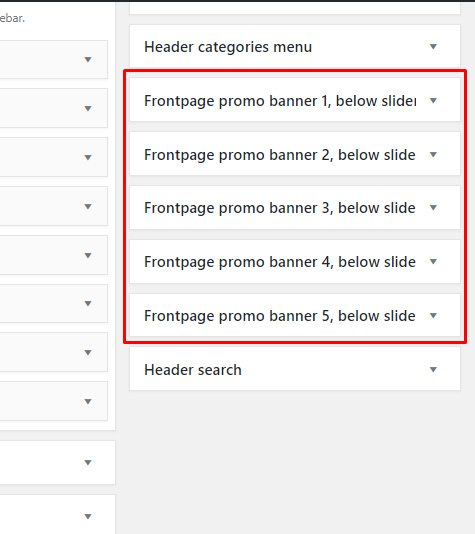
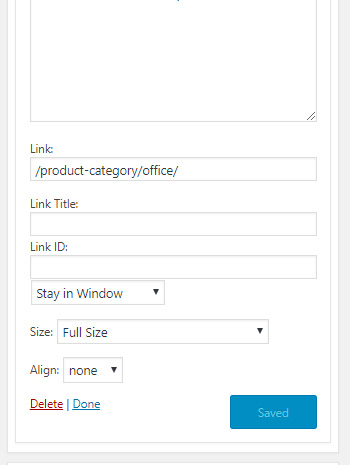
Select the frontpage Banner you would like to change (frontpage promo banner 1, 2, 3, 4 or 5) in the last column of the page
After you click on one of the widgets you’ll be able to change the image, title, caption, link, and many more:
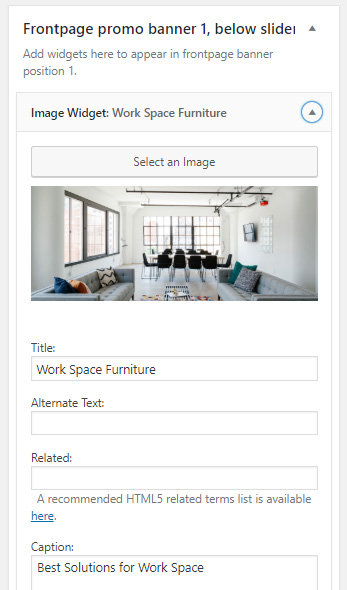
After you have made the changes you wanted, press “Save”.
Please note that if you only have 2 top category images, one of them needs to be 1000*400 px and the other one 500*400 px. If you have 3 or more category images in this area, all the images must be 500*400 px.
Woocommerce 2 template:
Access Customizer from left side menu -> Appearance:
http://woocomerce2.ecomitize.net/wp-admin/customize.php?return=%2Fwp-admin%2Findex.phpEnter section "Content options":
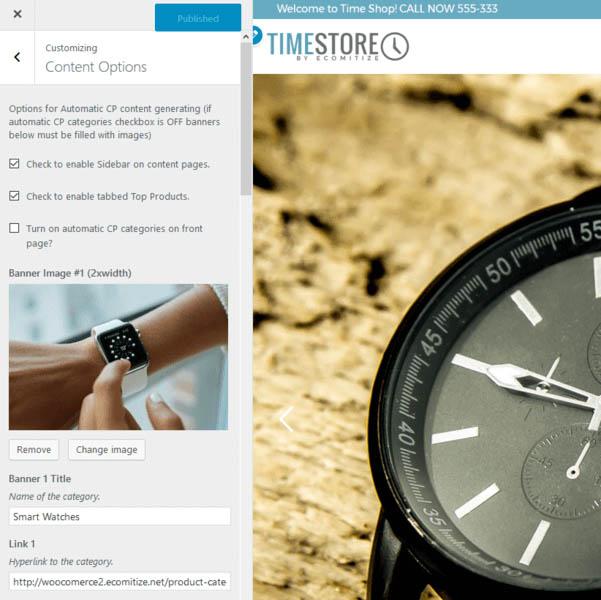
You have option 1, to automatically set categories from CounterPoint. This means that first 6 categories will auto-populate 6 front-page banners. In order for this to function properly, you must have:
- minimum of 6 top level categories
- in all top level categories set category thumbnail images
Please avoid this kind of st-up if you are not sure how to set up category images in CP and proceed to manual category set-up of the images:
- uncheck "Turn on automatic CP categories on front page?" checkbox
- for each of the 6 categories now you can set up manually category name, image and link.
- 1st and 6th image banners should have 900x500 minimum size.
- 2nd image banner should be at least 500x900px
- all others are squared aspect ratio at 500x500px
Woocommerce 4 template:
This template is pulling first 6 categories from CounterPoint and sets them as featured. You can manage category banners in CP. Any customization here is subject to custom development (please contact PM / support).
The item images need to be uploaded to Counterpoint.
Although we are managing image sizes automatically in Woocommerce, it is highly recommended for the images to be at least 600*600 pixels in order to achieve good overall performance of your store and quality buyer experience.
It is recommended to have the same size and ratio images to avoid issues with the item thumbnails on the category pages.
On the category pages, the item thumbnails are created automatically and zoom into the middle of the image. If most of your images are square but some are rectangular you might experience that the thumbnail crops part of the image. So it can happen that the item will not be fully visible in the thumbnail.
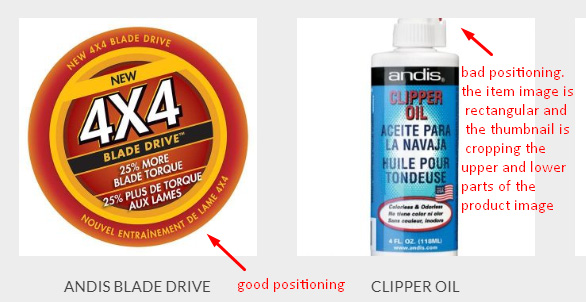
The item thumbnails are square by default.
If you find that most of your images are rectangular, please let us know or please reach out to us so we can set the thumbnails to rectangular. You will need to provide the ratio of the item images. If you don’t know the ratio, please send us at least two example images.
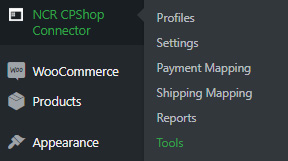
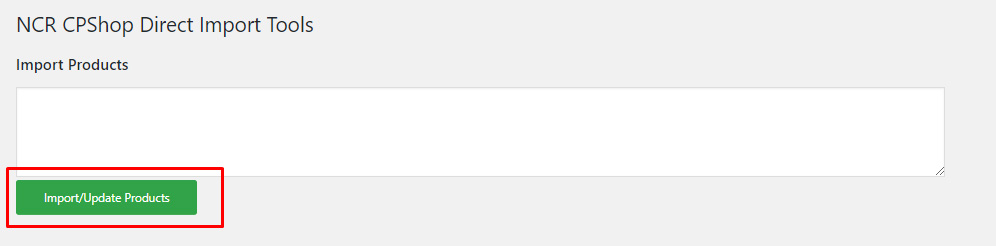
In the Dashboard go to NCR CPShop Connector → Tools
Insert the new product numbers separated by commas (e.g. 345345345,345345278,3456473,etc) and press the import button.
8.5.2 or BETTER is what is currently supported for integration. PLEASE NOTE: As of 12/1/2023 versions older than 8/6 will no longer be supported by NCR.