Do you want to build a sustainable e-commerce website using WooCommerce? Then you need an elaborate understanding of this combo platform tutorial to access the best it has to offer. If this is your dream, then this WooCommerce tutorial is the perfect starting point.
WooCommerce is the most popular, flexible, cost-effective, and easy-to-use e-commerce for newbies and pros. However, if you are a beginner, it will look intimidating and confusing. While many people struggle and angrily abandon a successful platform, we are helping you make headway in a crowded market.
Woocommerce WordPress boasts nearly 5 million current users, with over 7.4% of all online websites using it. WooCommerce powers 28.19%, 93.7% began with a WordPress account, and 22% of the top 1 million online stores globally use it. With such digital loyalists and happy customers, what is WooCommerce, and why is it so successful?
In this WooCommerce WordPress setup tutorial, we will walk you through a detailed guideline on setting it up. However, we will answer related WooCommerce WordPress questions to ensure success and help you grow online.
What is WooCommerce and why is it so successful?
WooCommerce is a fully customized open-source e-commerce platform for online entrepreneurs around the world. However, its popularity and stability are largely dependent on WordPress. This free e-commerce platform makes selling products and services seamless and easy even for less savvy tech people. Over the years, WooCommerce has grown to sustain millions of small, medium, and large businesses and building online assets into the millions.
As mentioned, WooCommerce is, by and large, an extension of WordPress, another extremely popular content management platform with over 1.3 billion active websites and 445 million users. Furthermore, WordPress, immense versatility allows it to be integrated into most systems or other systems to be utilized on it. With that said; WordPress powers 42.3% of e-commerce of online businesses.
Why is WooCommerce so successful?
The WooCommerce WordPress marriage is successful for so many reasons. For one, you can seamlessly integrate your e-commerce store with other sectors like content creation (blogs) and design the site the way you want. It is by far the simplest platform to sell on, add unlimited products, and learn too.
In fact, the amazing and uninterrupted hosting capability of WordPress makes WooCommerce WordPress the perfect platform for e-commerce entrepreneurs.
So how did this collaboration begin?
The platform began in 2008 and was developed by WooThemes, and it is absolutely free and the best plugin for reducing abandon shopping carts. So if you are ready, have a WordPress account, and want to run an e-commerce store, WooCommerce is the best platform to get started.
Now, we have put this WooCommerce tutorial to help you understand this incredible platform.
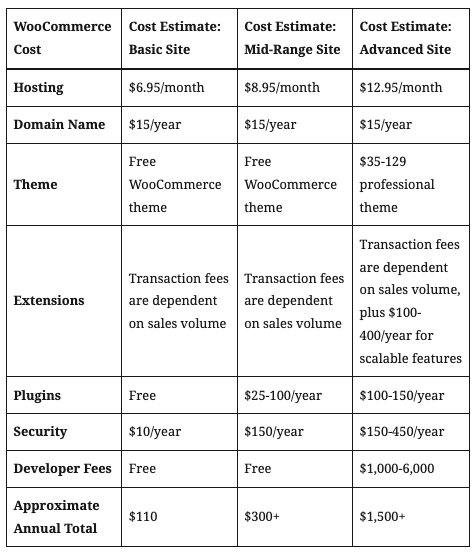
Is WooCommerce Free?
WooCommerce WordPress is free, open-source software, and while this is exciting, there is a WooCommerce cost you must pay attention to when launching your storefront.
Even though the cost can add up quickly, its versatility, customization, and control over what is paid for, unlike other platforms.
The cost accumulated on WooCommerce comes because it is not a standalone site but relies on WordPress for most of its functioning.
The costs include hosting charges, themes, domain names, extensions, shipping, tax, and even sales.
How to set up WooCommerce?
WooCommerce is a plugin on WordPress, and like most plugins, all you need is to download and install it on your WordPress using the “add new” option in the plugin drop menu.
Scan for the WooCommerce and hit the install button> activation and you are done.
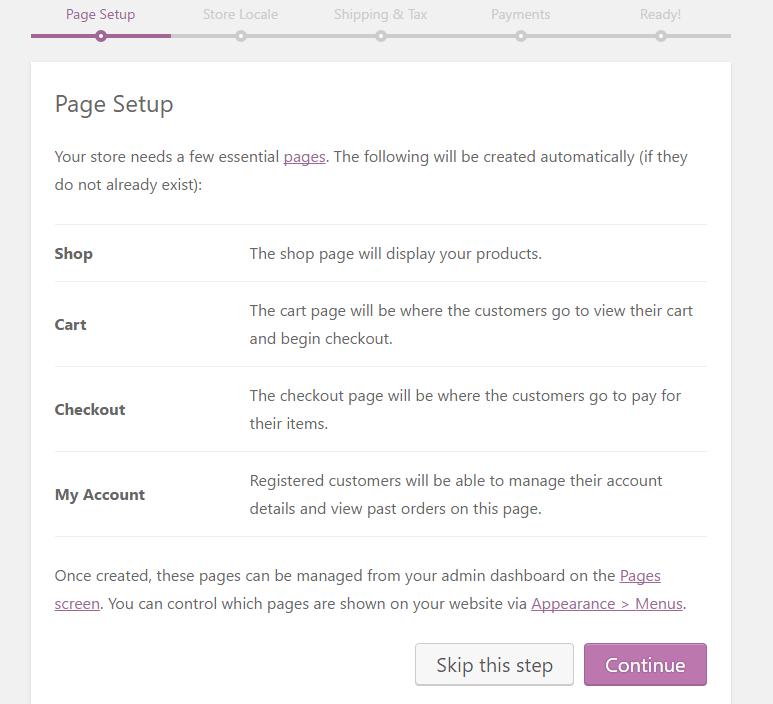
Accepting the “let’s go” button simplifies the process of creating pages on the platform.
Creating the WooCommerce shop page
If you are setting up a WooCommerce page for selling online, this is the next step. You will create all the pages that are necessary for your online store to function effectively. Regular e-commerce pages include product, payment, checkout, and shopping or service pages. When you cover the necessary pages, click on the continue icon as shown below.
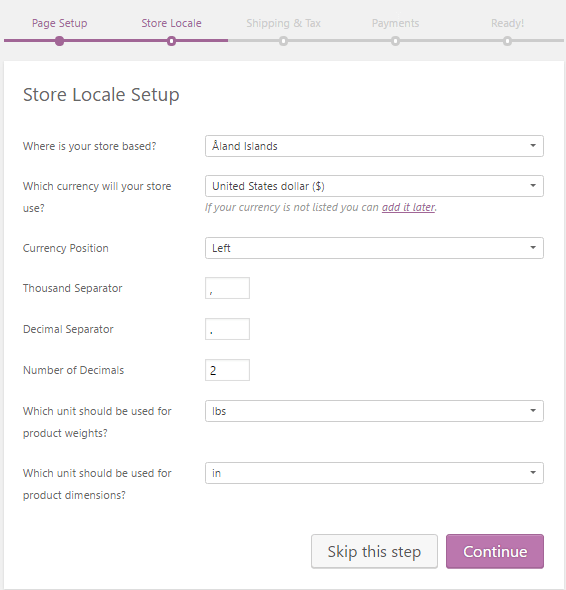
Setting up your shop locale
The next page sets up shop locale; the page prompt will instruct you to enter some details like where the store is located, pick your country from the drop menu, enter the payment currency and choose the unit measurement and dimension products packages would appear to the shoppers.
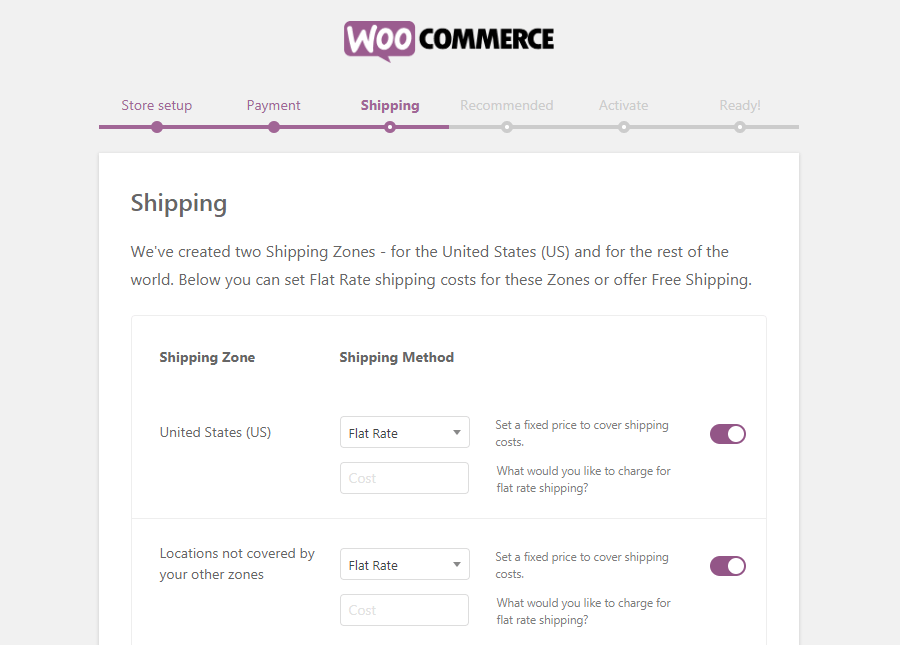
Configuring the Shipping and Tax Cost
In this category, you set up the cost for shipping and how much tax on each product per weight. If you do not know, WooCommerce can suggest the approved tax rates, but this step can be skipped if you offer free shipping with zero tax. You can always come back to make the necessary adjustment when you finally decide which products will be on sale.
Choosing a payment gateway
Well, people have to pay for their shopping and a suitable pathway will endear to your users and reduce cart abandonment. WooCommerce accepts a variety of payment options, but the choice is between Stripe and PayPal.
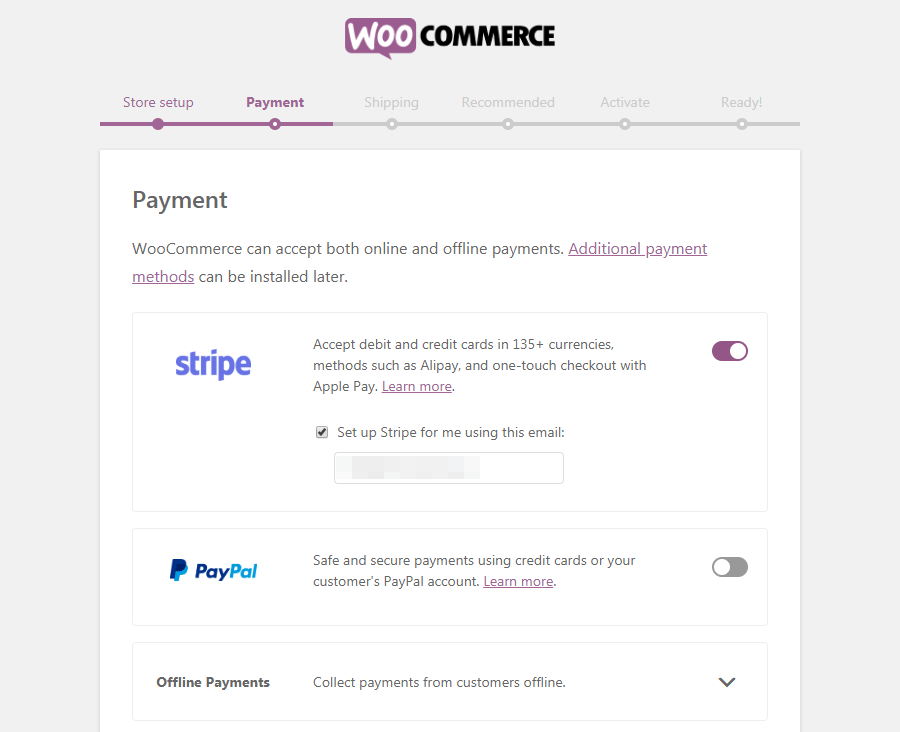
Other gateways available are bank transfers, cash on delivery, checks, and offline payments. Each route can be added or removed via the add-on.
When you choose the gateway of chose, click the continue button, and move on to the next step.
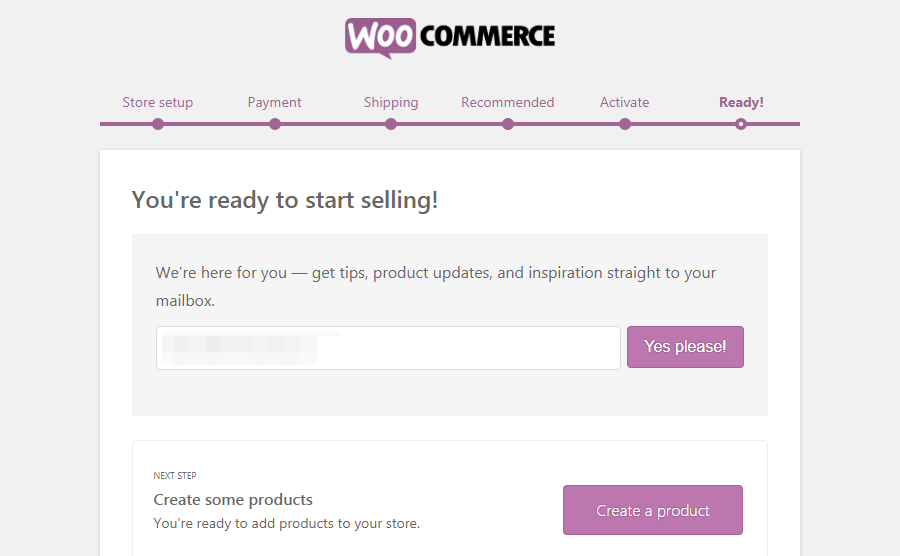
Your store is ready and you are ready to add products.
The next step is adding additional plugins and themes to make the customer’s experience on your WooCommerce webshop unforgettable.
Now that you are done, the store will start to sell. However, adding WordPress plugins that make WooCommerce function better.
This plugin is valuable but optional, so you can decide to install it or not.
Jetpack is the plugin, and the features are incredible and really helpful.
Managing your storefront on WooCommerce
When you are done with the installation process, it is time to start adding products. To start, return to your WordPress dashboard, where you will see two Meta boxes.
After the stage, start adding products to the page. Click on ‘products’ at the left-hand side of the screen, a page like the one below will appear.
Click ’add new’ and then proceed to fill out the blanks according to what is on this page.
The first line is the product name – add the product name using SEO Meta title rules for better visibility on Google search pages.
Next, add the Meta description of the products, remember to add the product features and other details to help the customer like weight and dimension.
Other information to add includes media (short video describing the product) and images. The data input here will appear on the main product page. Basically, get as creative as you would on this page, and the finishing should be spot on.
Now, without a visual connection with your customers, there is no link regardless of the creative Meta title and description.
Our suggestion is to use high-quality HD images; you can take the pictures yourself or visit the high stock images site for something beautiful.
Remember, the more products you add, the better, and try to capture all sides and angles to give the customer a 360-degree look of it like in a physical market.
Adding product category and types
The second row of the image above is the product data section as seen below.
The products categories available on WooCommerce are of 4 types. You choose the one suitable for your store; click the ‘single product’ column for the drop menu.
The following are the options:
The simple product is one you can add with all the details like the price and start selling immediately
A grouped product describes a group of items that go together, like baby stuff or clothing.
The external/affiliate product where you are not really the seller but direct customers to the shop that sells what you advertized
Variable products consist of different items in different sizes or colors or even brands.
If you are new to WooCommerce, we suggest starting with the Simple Product category. You can always go and make changes at any time or as the shop expands in the future.
Adding Price to Your Product Page
There are two price options in WooCommerce, as seen above in the image. The regular price is the actual cost of the item as it will appear on the storefront. The second is the sale price that allows you to add the discount and trigger a sale on your page.
For example, if you want a sale discount of 5% or 10%, schedule the day or duration and fill in the desired percentage.
In the image above, the left-hand side lists other categories as follows:
Inventory – this is the tab that determines the product status. At this stage, you can set the SKU of each product at every time. For example, if you started with 1000 products but have 20 left, go to inventory and adjust according.
Other useful tabs aside from inventory are:
Shipping section that allows you to enter product measurement including weight and dimensions
The shipping section also allows you to choose shipping types and classes. For example, choosing a flat shipping rate will cater to all product categories, sizes, and types.
The next tab is the Linked Products tab. This allows you to add upsells and cross-sells to a specific product.
An upsell sales technique allows you (the store owner) to recommend similar products to what the customer sees.
In a cross-sell, the seller recommends complementary products to what the customer has bought, like adding a belt to shoes, or shirt, or a sock.
The next tab attributes and variation for customizing your product page and telling your customers more about it.
For example, attributes give in-depth information about the product, describing its uses, features, and more like texture and size. The variable tab talks about the options that the product is available in as color and style.
Customizing your WooCommerce Store
Remember, we discussed installing the Jetpack plugin; if you did, it is good for you. Here are some customized settings to make your WooCommerce page look professional.
Orders
As an e-commerce store, it is paramount you can view the orders made on your page at each point. If you are dealing with physical goods, order status changes to show paid, refund, pending payments, failed transaction or received.
However, if your store deals with digital products, the above features are absent except for a notification that shows what is bought and who bought it. The order page allows you to change or adjust the customer’s shipping address, billing address, and more.
Coupon Page
Coupons are a great way to create and manage discounts and rewards available to the customer. To enable coupon, follow the steps
On the WooCommerce dashboard
- Click settings> general> enable coupons
- Tap on the box to tick the option and save the changes
- The same process applies when adding rewards to your page too.
WooCommerce Report
If you run an online commerce store, it is best to know how you are doing. Or wouldn’t you say so? The report section on WooCommerce works like Google Analytics to summarize all aspects of your store and how you are fairing.
The report shows gross and net sales, orders, items purchases, fulfilled, refunds, shipping, billing coupon, and all. Look at the WooCommerce report like a bank statement sheet.
The report does a little more too. It gives an overview of your store’s sales, stock, and taxes.
Status
To keep your WooCommerce shop page running smoothly with adequate knowledge of how your system is working.
This page shows you basic information about possible errors that might occur or occur during operation. So our advice is to always check this page before jumping into your store daily. Check the WooCommerce page to understand more about how the status works.
Understanding WooCommerce Virtual Products
Store owners who want to use WooCommerce for service utilize their storefront to display virtual products. Virtual products are intangible products without a physical embodiment. They are also known as digital products and represent services like membership, music downloads, books download, game modules, subscriptions, and more.
Unlike physical products, virtual products are sent directly to your server and stored on your system. So you never worry about it running out unless your system becomes infected in the future.
Why are virtual products better than physical products?
People buy solutions, and it is easier to sell as you do not need all the processes listed out for physical products and requires little or no customization. With virtual products, the customer gets exactly what they saw and clicked to buy.
Virtual products are downloadable or non-downloadable. For example, if you sell music tunes or songs, customers can decide to listen online or download them to their systems after purchase confirmation. It works with books too. However, some virtual services like subscriptions, show or movie tickets, or memberships are downloaded and printed out for use.
Additionally, customers can scan the QR code of the products and present it at the location where it is required. Remember, simple, variable, and grouped products can also be virtual products.
How to install WooCommerce Extensions
Extensions are also plugins and are essential features that make your WooCommerce page function better and are available on WooCommerce.com. For you to have access to an extension, you must have an active WooCommerce account. Until recently, the number of plugins you get is directly related to the subscription you chose. You can upgrade to the next level if your plugins are exhausted.
Installing WooCommerce Extension
- Step-1 – Go to your WooCommerce dashboard > plugins
- Select add new > search plugins and type WooCommerce
Search for WooCommerce by Automatic and click the install button.
Conclusion
Well, you have finally made it to the end of this tutorial, and we are proud of you.
However, what we have here is the basics of WooCommerce. There is still a lot to learn, but the WooCommerce WordPress e-commerce platform is easy with countless features to help you succeed.
Building your store with WooCommerce is incredible, it gives you full access to fascinating features; you are in control of your page. One disadvantage is it is hosted by WordPress but, if you are looking to sell and advertise on one platform, the WooCommerce WordPress combo is the best, and this WooCommerce tutorial is a great start.
If you cannot handle the technicalities associated with setting up, installing, and designing your page; contact the Ecomitize team now.