When it comes to eCommerce platforms WooCommerce is number 1, with a staggering 29% market share. How has Woo achieved this remarkable feat – WooCommerce is easy to use, powerful, and highly scalable.
The great thing about Woo is its ability to grow with you, whether you’re a developer or store owner the platform has all the capability you need. And the more that you know about the platform the more you’ll be able to get out of it.
There’s a treasure trove of features, and functionality to discover under the hood of WooCommerce, you just need a little know-how, and that is what we’ll try to give you in this article. Whether it’s the WooCommerce shipping calculator, powerful options via extensions, productivity hacks, or simple ways to save time through automation- we’re here to unpack it all and give you tips to help you get the most from WooCommerce.
How to show off your products
Product pages are where it all happens. It’s where retailers get to show off their wares and where eager shoppers might, and I say might take the plunge and commit to a purchase. To make sure you do convert people browsing into customers it would make sense to show your products in the best possible light. So here are a few tips to do just that.
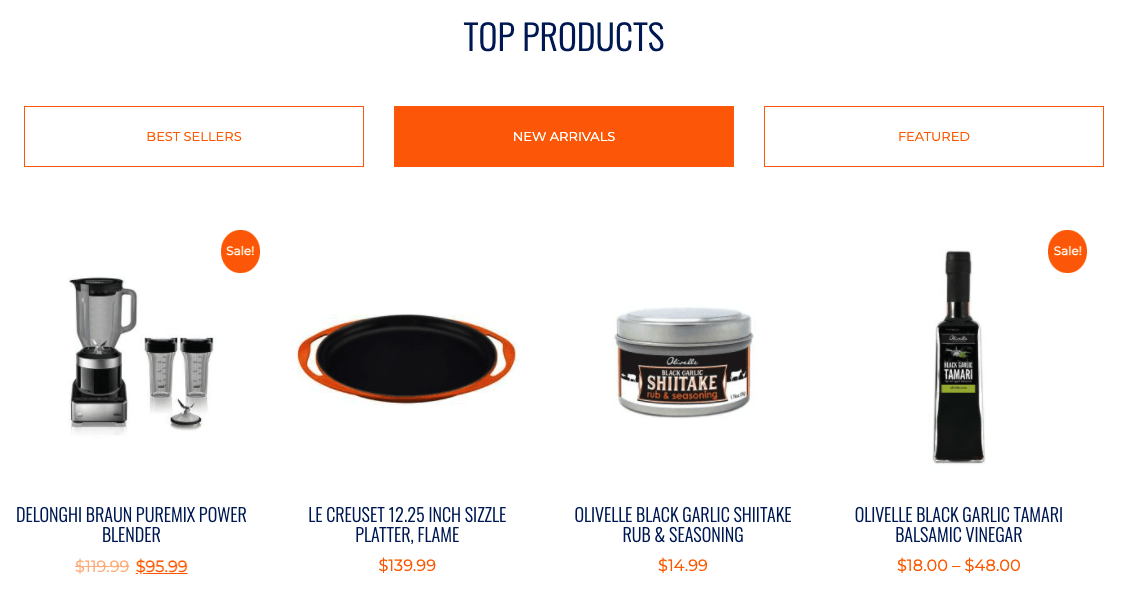
Designate and Display WooCommerce Featured Products
Have you ever spotted the little stars next to your list of products? Ever taken the chance and starred a product?

What this does is set an item as “featured”. Depending on the theme of your store, when you star an item you should find it dropped into a special “featured” area. You’ll then see the item in the demo of the storefront. This works wonderfully for products that are new, have received a recent price change, or any other reason you want to draw attention to a product.
WooCommerce Product Image Size
It sounds incredibly simple, but make sure your products look great. Shoddy, blurry images are going to do nothing for your online business, after all, 38% of visitors will leave if they don’t like the aesthetics of your store.
But what is the benefit of setting your WooCommerce products image size?
- Preventing image blurriness- images that aren’t the right size can often appear blurred, devaluing the quality of products.
- Speed – bigger images take longer to load-simple. Just a 1% delay can see customers walking out the door, and nobody wants that.
So how big should images be?
This is somewhat down to your chosen theme. However, the original images you upload should be at least 800 x 800 px or higher to work for most themes.
If you have a product that’s complicated and/ or detailed you may want to upload a large image- one that enables potential customers to zoom and in. If that is the case, images 200xp wide might be sensible. However don’t go too big, an oversized image will slow a site down!
To adjust image sizes head to the customizer. Go to “Appearance” > “Customize” > “WooCommerce” > “Product Images”.
Once there you can set the main image width, thumbnail width, and thumbnail cropping. Calculated automatically based on your settings, image heights have been removed. Just to note, your chosen “main’ or single product image does not have any crop settings, they’ll always show up uncropped. Immediately after you make changes to these settings, WooCommerce will automatically create new image sizes.
To check the status of the background regeneration, simply go to “WooCommerce Status” > Logs and select the log “wc-image-regeneration” from the dropdown menu.
Add Images for Individual Product Variations
Retailers are likely to have different variations of the same product- different colors, sizes, or materials. You could rely on the text description of your variation to highlight differences between products, but wouldn’t it be much easier to show your audience, and potential customers the difference using images?
After all, images are extremely useful for selling, most of the time we only read 20% of text. And that’s why images are far better at capturing our attention and driving sales.
By adding an individual image to each of your product variations your customers will see the actual product they’re interested in.
To add an image to a variable product, simply expand the variation in question, click on the blue image icon, upload the image, and save your changes. Done!
Make it Easy for Shoppers
Giving shoppers the information they need to make a purchase is crucial, shoppers often know what they’re looking for, you just need to make it easy for them to find it.
WooCommerce Variable Product
Let’s start off by asking the question- what is a WooCommerce variable product?
It’s simply a product type which allows you to select options, like different colors, size, SKU. All of these options are known as “attributes”, of which there are hundreds. When choosing a product a customer will select from all the different attributes to make up a final variation of the product. For example “pink t-shirt” – “slim fit” – “m/s”. A WooCommerce variable product page allows customers to choose the product variation they want through drop-down menus on the product page.

How to create variable products.
STEP 1. Create a New Product or Edit an Existing Product.
Go to “WooCommerce” > “Products” > Choose either the “Add Product” button or “Edit” an existing product. Data from the product is then displayed > Choose “Variable Product” from the “Product Data” dropdown.
STEP 2 – Add Attributes Before Creating Variations
Here you have two options- use global attributes that are site-wide or define custom ones specific to a product.
Global– create global attributes > select one from the dropdown > choose “select all” to add all attributes to the variable product > enable “used for variations”.
Custom – choose “custom product attributes” and select > name the attribute (e.g color) > manage values separated by a vertical pipe e.g small, medium, large. > select the “Used for variations checkbox”.
STEP 3 – Create Variations
Almost there! To add variations simply head to the “variations” section in the product data box > click “add variation” > “select attributes” > choose attributes and save.
That’s the basics for variable products if you want to find out more about the topic head over to WooCommerce.
Create and Assign Custom Labels to Product Thumbnails
As we’ve highlighted already, images are incredibly important, but sometimes you need text to convey the message. If you have information that you need customers to know such as an item being “on-sale” or maybe a product has “low stock” you might need the help of custom labels.
There’s no need to play around with CSS or custom code, WooCommerce Advanced Product Labels is an extension that provides retailers the opportunity to add fully customizable labels to thumbnails (in category and filtered views) allowing the customer to find out useful information about the products they’re browsing, which in turn might lead to a sale.

If you’re not feeling the extension (there is a $49 charge) WooCommerce has a huge catalog of information showing you how you can add an advanced product label. It’s the kind of customization that gets people clicking. Flag up items for being; on sale, reduced, low in stock, free shipping… whatever you need it’s there.
Woocommerce Number of Products Per Page
By default, the number of products on a page is 16, displayed in 4 rows by 4 columns. That could be exactly what you want, but what if you want more, and why would you want more?
By adding images you can display more information in a shorter space. If you’re a business with lots of products, shoppers are likely to get lost moving between the reams of products, all on different pages-recent research shows the average attention span of a human being is less than our golden friends the goldfish. Think about how cross-selling can increase revenue, add more images to entice shoppers to add more to their trolleys.
On the flip side maybe your pages are overly cluttered, people browsing your site are finding it hard to see your products, in which case it’s time to clean up your pages and provide you products with the platform they deserve.
Before attempting to change anything, make sure you backup everything on your page. It would also make sense to have a child theme in place, just for safety as everything might disappear after a while.
First check if your theme allows you to change the WooCommerce number of products, if it does:
Head to the admin area in WordPress, hover above the appearance button> in the drop-down menu choose “customize” open and the WordPress optimizer tool will appear > go to “Product Catalogue” where you can see “Products per Row” > adjust accordingly. If that doesn’t work you’ll need a simple code snippet, for which WooCommerce has an excellent guide.
Allow Products to be Filtered by Attributes
“The Layered Navigation Widget” is the built-in widget that allows shoppers to filter products displayed by search results through their attributes- such as color, style, size.
The best thing about all of this is that if you have variations set up already, you’ll also have attributes in place. If not you can go back and add attributes manually.
With attributes in place, simply drag the layered navigation widget to any widgetized area, potential customers will then be able to filter down through products finding the item they want by filtering through attributes – one, large, pink, blow-up flamingo- coming right up!
You can learn about how to set up the layered navigation available in WooCommerce right here.
Allowed Products to be Filtered by Their Ratings
Back in the day, word of mouth was one of the most powerful ways of businesses acquiring new customers, it’s the trust that’s generated through a friend endorsing a product or service “the best stonemason is just around the corner, tell him John sent you”- it went something like that. And today is no different!
- Most people (70%) will trust a recommendation from someone they don’t know.
And
- Online conversions increase 133% when shoppers see positive reviews.
All the more reason to allow shoppers to filter products by their ratings.
As long as you have WooCommerce 2.6 the layered navigation widget you can add this option for shoppers. As customers start to review products your store will build up a hefty database that allows shoppers to search for items by rating.
How to do it?
From the WooCommerce dashboard go “settings” > select “products” > scroll to “review settings” and select “enable product reviews” > if you want customers to review through stars click “enable star rating” > save changes.
Sell More. Show Shoppers What They Need.
You’ve done all the hard work, and your highly successful marketing campaign has seen an influx of people browsing your store. You have shopper’s attention- this is precisely the time to introduce more of your fantastic products.
WooCommerce Related Products
“Maybe this top with those pants?” says the store assistant with gleeful exuberance in her eye. Ok, an online store can’t quite do this yet, however, your store can suggest related products to the ones that a customer is viewing.
Related products can be related to each in three different ways; cross-sells, up-sells, or by sharing tags or categories with other products. And related products are one of the most powerful ways of boosting sales- Amazon reports that up to 35% of its sales come from cross-sales.

Cross-sell
Cross-sells are recommended products that are based on the current product in a shopper’s cart. These items are suggested as complementary purchases. When purchasing a laptop, you might see recommendations pop up for USB sticks, adaptors, or protective cases.
Where these products are displayed is largely down to the theme of the website, but typically related products will be displayed on the cart page beneath the cart products table.
Up-sell
Up-selling is quite simple, while a customer is viewing a product your website recommends a product that has more features, which is also more profitable for your company. Like cross-selling, these products will be displayed at the bottom of the product page, underneath the product description.
How to set up related products- Access the linked products area of your product page through the “dashboard” > head to the product you want to up-sell/cross-sell > scroll down to the “Product Data” section, and click the “Linked Products” tab.
After clicking on the “Linked Products” tab you will be given two options, one for up-selling and one for cross-selling.
Adding your WooCommerce related products is simple, just type in your related products into the appropriate fields. Whilst typing different products will be suggested, just choose the one you need.
Once you’re done adding related products, scroll to the top and select the button “Preview Changes” in the Publish widget. You will then be given a preview of your up-sells, which will be directly under the product, and below that the cross-sells
WooCommerce Grouped Product
Included in WooCommerce core, grouped products are the perfect way to let customers add similar products from a range to their cart in one go. In a similar way to cross-selling, grouped products group individual products into combinations of products, and as you can see from below the visual, presentation of the products allows the customer to really think about what they’ll need now, things they might need in the future and products they didn’t know they needed. All in all it’s a great way of bringing in a significant amount of revenue that you wouldn’t be getting if you were displaying single products.

So how do you create grouped products? Once you have added a product head to product page > find and click “grouped product” > under “grouped product” click on “linked product” > type in the product you wish to group, Woo kindly suggests options of existing products to make things easy > save and preview!
Shipping and Orders
Shipping can become a bit of a bore, and at times quite tedious, that’s if you don’t make use of some of WooCommerce’s shipping features- they’re there to make your life easier, save time and money.
WooCommerce Shipping Classes
Calculating shipping costs isn’t always straight forward- it’s not just about distance traveled, the weight and size also go into calculating shipping costs. If you’re selling products that are the same weight/ size lucky you! However most retailers aren’t doing this, so you’ll need to make sure your store is prepared to adjust shipping rates for products of all shapes and sizes, and this is where WooCommerce Shipping classes come in.
Shipping classes, automatically adjust your shipping rates during checkout to make sure the correct amount of shipping is linked to the purchase- you don’t want customers paying shipping for a light item when you’re shipping marble statues. By using shipping classes, products with the same attributes relating to shipping will be grouped together, for example, marble statues would be in one shipping class, whilst marble candle holders would be grouped in another class. It’s simple stuff but can really save time, and money by avoiding the process of manually correcting shipping costs.
How to do it?
Step 1. Add Shipping Classes
From “settings” > head to “shipping” > click on “shipping classes” > select “add shipping classes” > enter a “shipping class name” and “description”
Step 2. Assign Shipping Classes to Products
In the dashboard head to “products” > select the product then click “edit” > go to “shipping” > select shipping class from the dropdown > update and save.
WooCommerce Shipping Calculator
Giving clear information to shoppers, pre-purchase can only help to raise trust- we’ve all been there- you spend hours trying to find the right product at the right price only to discover the price of shipping is the same price as the product!
In the United State, the biggest three shipping providers – USPS, FedEx, and UPS all offer an online quote generator, to allow you to see what shipping will cost.
There are highly accurate WooCommerce extensions that provide up to the minute shipping information from all the major players. This type of service provides transparency to operations, allowing your brand to build trust with the customers purchasing your products and more sales.
Woocommerce Order Status Control
By default, WooCommerce will only auto-complete paid orders for products that are both downloadable and virtual, but if you want to automatically complete other orders you’ll need an extension.
With the WooCommerce Order Status Control extension, you can control which types of paid orders should be automatically placed in Completed status. The extension also allows you to automatically complete:
- All paid orders, irrespective of the ordered products.
- No orders, regardless of the ordered products.
- Paid orders for virtual products, without needing those products to be marked as Downloadable.
If an order set to auto-complete is paid, it will skip the “processing” step and go straight to “Completed” status. This nifty extension could save you a lot of time playing around with orders, we’d recommend having a look at it if automatically completing orders is something you need.
Use Slack
If you haven’t heard of Slack, you’re missing out! Basically, you can create multiple “channels’ (like chat rooms) that can be used for anyone. Simply create a channel just for the WooCommerce activity feed, or create one for general conversation among your organization. It’s a great way to keep your team update to date about current events, and for resolving issues. It’s a must-have for a company that has staff working different schedules/ in different time zones.
The standout feature of Slack is its ability to be used with WooCommerce. You need an extension, but once you have, any channel can receive notifications from Woo about new orders, low stock, new reviews, newly signed up customers, and much more!
Integrate with slack with WooCommece and receive notifications to your team as they happen.
Remove Ratings
Ratings- yes it’s great to have reviews, social proof can work wonders, however sometimes there’s an item you don’t want reviews for, maybe it’s products from other manufacturers or a free item that comes when you buy over a certain amount. Whatever it is, to disable reviews just load up the product click the “advanced” tab, and deselect the final option.
No reviews no problem!
Search and Find Your Own Tips and Tricks
Why is WooCommerce one of the leading eCommerce website platforms in the world? Because of its versatility and ability to be customized. Playing around with the settings, trying different themes, and adding different extensions can transform a store- and often it doesn’t take much time or effort. If you find any tips or tricks we haven’t covered be sure to share them! We love hearing about how businesses use WooCommerce to its fullest.
We hope you enjoyed the topics and ideas we’ve covered, and perhaps it’s given you energy to try different things with your own site. If you want to know more about how you can get the most out of WooCommerce get in contact with us and we’ll show you how you can get an eCommerce store that gets you ahead of the competition.